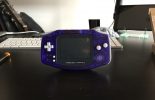
Swapping the shell on a Gameboy Advance gives a worn or yellowed classic a completely new appearance — custom shells are available in dozens of colours and transparency options, and the process of disassembling and reassembling the GBA is well-documented and accessible to anyone comfortable with small electronics. It’s a cosmetic mod rather than a functional one, but the results can be striking, and the process teaches you the layout of the hardware well enough to tackle more ambitious mods later.
The Process
The GBA uses Tri-Wing screws on the back and Philips screws inside — you need both screwdrivers for the full disassembly. The shell splits into front and back halves, with the PCB, screen, and buttons sitting between them. Transfer everything carefully from the old shell to the new one, noting the orientation of the ribbon cable and the placement of the shoulder button springs (the most common source of reassembly problems). The new shell should click together cleanly with no gaps if the parts are quality replicas.
Verdict
A shell swap is a satisfying first Gameboy mod — the results are immediately visible, the risk of damaging the electronics is low, and the skills learned transfer directly to more complex modifications like backlight installs and IPS screen upgrades. Custom shells from reputable AliExpress or RetroModding sellers are generally good quality with well-aligned screw holes and button cutouts. A worthwhile cosmetic upgrade for any GBA.
Leave a Reply
You must be logged in to post a comment.