
This is a WordPress Security mega-post containing a lot of best-practice information on securing, hardening, updating and maintaining a WordPress site.
Used by more than 60 million websites, including 30% of the top 10 million websites as of April 2018, WordPress is the most popular website management system in use. (wikipedia)
This makes WordPress a massive target for hackers.
1) WordPress Security – Background Information
OWASP Top 10 Most Critical Web Application Security Risks
The OWASP Top 10 is a powerful awareness document for web application security. It represents a broad consensus about the most critical security risks to web applications. Project members include a variety of security experts from around the world who have shared their expertise to produce this list.
- A1:2017 Injection
- A2:2017 Broken Authentication
- A3:2017 Sensitive Data Exposure
- A4:2017 XML Extended Entities (XXE)
- A5:2017 Broken Access Control
- A6:2017 Security Misconfiguration
- A7:2017 Cross Site Scripting (XSS)
- A8:2017 Insecure Deserialisation
- A9:2017 Using Components with known vulnerabilities
- A10:2017 Insufficient Logging and Monitoring
https://www.owasp.org/index.php/Category:OWASP_Top_Ten_Project
Common Vulnerabilities and Exposures
Common Vulnerabilities and Exposures (CVE) is a list of entries-each containing an identification number, a description, and at least one public reference-for publicly known cybersecurity vulnerabilities. CVE Entries are used in numerous cybersecurity products and services from around the world, including the U.S. National Vulnerability Database (NVD).
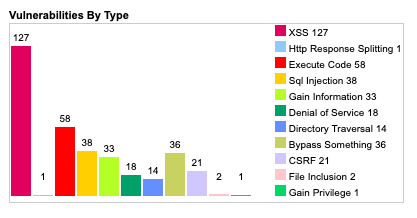
There are 334 CVE listed in the CVE details site from 2004-2019, with 17 reported in 2018 and 46 reported in 2017 – 127 of the 334 are XSS vulnerabilities, 58 are code execution vulnerabilities and 38 are SQL Injection (15 of which were in 2008, and 4 of which were in 2017)
Some examples of attacks that have happened in WordPress Security recently
CVE-2018-7543
Duplicator WordPress Migration Plugin Reflected Cross Site Scripting Exploit
Duplicator is a WordPress plugin with more than 1 million active installations. Version 1.2.32 (and possibly previous versions) are affected by a Reflected XSS vulnerability.
https://www.exploit-db.com/exploits/44288
CVE-2019-8942
WordPress before 4.9.9 and 5.x before 5.0.1 allows remote code execution because an _wp_attached_file Post Meta entry can be changed to an arbitrary string, such as one ending with a .jpg?file.php substring.
An attacker with author privileges can execute arbitrary code by uploading a crafted image containing PHP code in the Exif metadata.
https://nvd.nist.gov/vuln/detail/CVE-2019-8942
2) WordPress Security – Install a security plugin
Fortunately WordPress has a great community of developers, and offers many plugins to add various features, including improving the security of your WordPress install. Here are 4 of the best WordPress security plugins, with over 3.3 million installs between them
Wordfence WordPress Security (2+ million installs)
Wordfence includes an endpoint firewall and malware scanner that were built from the ground up to protect WordPress. The Threat Defense Feed arms Wordfence with the newest firewall rules, malware signatures and malicious IP addresses it needs to keep your website safe. Rounded out by a suite of additional features, Wordfence is the most comprehensive WordPress security solution available.
WORDPRESS FIREWALL
- Web Application Firewall identifies and blocks malicious traffic.
- Built and maintained by a large team focused 100% on WordPress security.
- [Premium] Real-time firewall rule and malware signature updates via the Threat Defense Feed (free version is delayed by 30 days).
- [Premium] Real-time IP Blacklist blocks all requests from the most malicious IPs, protecting your site while reducing load.
- Protects your site at the endpoint, enabling deep integration with WordPress.
- Unlike cloud alternatives does not break encryption, cannot be bypassed and cannot leak data.
- Integrated malware scanner blocks requests that include malicious code or content.
- Protection from brute force attacks by limiting login attempts, enforcing strong passwords and other login security measures.
WORDPRESS SECURITY SCANNER
- Malware scanner checks core files, themes and plugins for malware, bad URLs, backdoors, SEO spam, malicious redirects and code injections.
- [Premium] Real-time malware signature updates via the Threat Defense Feed (free version is delayed by 30 days).
- Compares your core files, themes and plugins with what is in the WordPress.org repository, checking their integrity and reporting any changes to you.
- Repair files that have changed by overwriting them with a pristine, original version. Delete any files that don’t belong easily within the Wordfence interface.
- Checks your site for known security vulnerabilities and alerts you to any issues. Also alerts you to potential security issues when a plugin has been closed or abandoned.
- Checks your content safety by scanning file contents, posts and comments for dangerous URLs and suspicious content.
- [Premium] Checks to see if your site or IP have been blacklisted for malicious activity, generating spam or other security issue.
WORDFENCE CENTRAL
- Wordfence Central is a powerful and efficient way to manage the security for multiple sites in one place.
- Efficiently assess the security status of all your websites in one view. View detailed security findings without leaving Wordfence Central.
- Powerful templates make configuring Wordfence a breeze.
- Free to use for unlimited sites.
SECURITY TOOLS
- With Live Traffic, monitor visits and hack attempts not shown in other analytics packages in real time; including origin, their IP address, the time of day and time spent on your site.
- [Premium] Stop brute force attacks permanently by using two factor authentication, one of the most secure forms of remote system authentication available.
- Block attackers by IP or build advanced rules based on IP Range, Hostname, User Agent and Referrer. [Premium] Country blocking available with Wordfence Premium.
Sucuri (400k+ installs)
Sucuri Inc. is a globally recognised authority in all matters related to website security, with specialisation in WordPress Security.
The Sucuri Security WordPress plugin is free to all WordPress users. It is a security suite meant to complement your existing security posture. It offers its users a set of security features for their website, each designed to have a positive effect on their security posture:
- Security Activity Auditing
- File Integrity Monitoring
- Remote Malware Scanning
- Blacklist Monitoring
- Effective Security Hardening
- Post-Hack Security Actions
- Security Notifications
- Website Firewall (premium)
Bulletproof (70k+ installs)
WordPress Security Protection: Malware scanner, Firewall, Login Security, DB Backup, Anti-Spam & much more. Secure your WordPress website even further by adding additional BulletProof Security Bonus Custom Code. Effective, Reliable & Easy to use WordPress Security Plugin.
BULLETPROOF SECURITY FEATURE HIGHLIGHTS
- One-Click Setup Wizard
- Setup Wizard AutoFix (AutoWhitelist|AutoSetup|AutoCleanup)
- MScan Malware Scanner
- .htaccess Website Security Protection (Firewalls)
- Hidden Plugin Folders|Files Cron (HPF)
- Login Security & Monitoring
- JTC-Lite (Limited version of BPS Pro JTC Anti-Spam|Anti-Hacker)
- Idle Session Logout (ISL)
- Auth Cookie Expiration (ACE)
- DB Backup: Full|Partial DB Backups | Manual|Scheduled DB Backups | Email Zip Backups | Cron Delete Old Backups
- DB Table Prefix Changer
- Security Logging
- HTTP Error Logging
- FrontEnd|BackEnd Maintenance Mode
- UI Theme Skin Changer (3 Theme Skins)
- Extensive System Info
- BULLETPROOF SECURITY PRO FEATURE HIGHLIGHTS
- One-Click Setup Wizard
- Setup Wizard AutoFix (AutoWhitelist|AutoSetup|AutoCleanup)
- AutoRestore Intrusion Detection & Prevention System (ARQ IDPS)
- Quarantine Intrusion Detection & Prevention System (ARQ IDPS)
- Real-time File Monitor (IDPS)
- MScan Malware Scanner
- DB Monitor Intrusion Detection System (IDS)
- DB Diff Tool: data comparison tool
- Backup: Full|Partial DB Backups | Manual|Scheduled DB Backups | Email Zip Backups | Cron Delete Old Backups
- DB Status & Info: extensive database status & info
- Plugin Firewall (IP Firewall): Automated Whitelisting & IP Address Updating in Real-time
- JTC Anti-Spam|Anti-Hacker
- Uploads Folder Anti-Exploit Guard (UAEG)
- .htaccess Website Security Protection (Firewalls)
- Hidden Plugin Folders|Files Cron (HPF)
- Custom php.ini Website Security
- Login Security & Monitoring w/Dashboard Alerting|Status Display & additional options/features
- Idle Session Logout (ISL)
- Auth Cookie Expiration (ACE)
- F-Lock: Read Only File Locking
- FrontEnd|BackEnd Maintenance Mode
- Security Logging
- HTTP Error Logging
- PHP Error Logging
- DB Table Prefix Changer
- S-Monitor: Monitoring & Alerting Core
- Pro Tools: 16 mini-plugins
- Heads Up Dashboard Status Display
- UI Theme Skin Changer (3 Theme Skins)
- Extensive System Info
iThemes Security(900k+ installs)
iThemes Security (formerly Better WP Security) gives you over 30+ ways to secure and protect your WordPress site. On average, 30,000 new websites are hacked each day. WordPress sites can be an easy target for attacks because of plugin vulnerabilities, weak passwords and obsolete software. iThemes has been building and supporting WordPress tools since 2008
PRO FEATURES
- Two-Factor Authentication – Use a mobile app such as Google Authenticator or Authy to generate a code or have a generated code emailed to you.
- WordPress Salts & Security Keys – The iThemes Security plugin makes updating your WordPress keys and salts easy.
- Malware Scan Scheduling – Have your site scanned for malware automatically each day. If an issue is found, an email is sent with the details.
- Password Security – Generate strong passwords right from your profile screen.
- Password Expiration – Set a maximum password age and force users to choose a new password. You can also force all users to choose a new password immediately (if needed).
- Google reCAPTCHA – Protect your site against spammers.
- User Action Logging – Track when users edit content, login or logout.
- Import/Export Settings – Saves time setting up multiple WordPress sites.
- Dashboard Widget – Manage important tasks such as user banning and system scans right from the WordPress dashboard.
- Online File Comparison – When a file change is detected it will scan the origin of the files to determine if the change was malicious or not. Currently works only in WordPress core but plugins and themes are coming.
- Temporary Privilege Escalation – give a contractor or someone else temporary admin or editor access to your site that will automatically reset itself.
- wp-cli Integration – Manage your site’s security from the command line.
BRUTE FORCE ATTACK PROTECTION
iThemes Security takes brute force attack protection to the next level by banning users who have tried to break into other sites from breaking into yours. The iThemes Brute Force Attack Protection Network will automatically report IP addresses of failed login attempts and will block them for a length of time necessary to protect your site based on the number of sites that have seen a similar attack.
PROTECT
iThemes Security works to protect your site by blocking bad users and increasing the security of passwords and other vital information.
- Prevents brute force attacks by banning hosts and users with too many invalid login attempts
- Scans your site to instantly report where vulnerabilities exist and fixes them in seconds
- Bans troublesome user agents, bots and other hosts
- Strengthens server security
- Enforces strong passwords for all accounts of a configurable minimum role
- Forces SSL for admin pages (on supporting servers)
- Forces SSL for any page or post (on supporting servers)
- Turns off file editing from within WordPress admin area
- Detects and blocks numerous attacks to your filesystem and database
DETECT
iThemes Security monitors your site and reports changes to the filesystem and database that might indicate a compromise. iThemes Security also works to detect bots and other attempts to search vulnerabilities.
- Detects bots and other attempts to search for vulnerabilities.
- Monitors filesystem for unauthorized changes.
- Run a scan for malware and blacklists on the homepage of your site.
- Receive email notifications when someone gets locked out after too many failed login attempts or when a file on your site has been changed.
OBSCURE
iThemes Security hides common WordPress security vulnerabilities, preventing attackers from learning too much about your site and away from sensitive areas like your site’s login, admin, etc.
- Changes the URLs for WordPress dashboard areas including login, admin and more
- Completely turns off the ability to login for a given time period (away mode)
- Removes theme, plugin, and core update notifications from users who do not have permission to update them
- Remove Windows Live Write header information
- Removes RSD header information
- Renames “admin” account
- Changes the ID on the user with ID 1
- Change the WordPress database table prefix
- Changes wp-content path
- Removes login error messages
3) WordPress Security – Web application firewall
What is a WAF
A WAF is a web application firewall. A Web Application Firewall protects HTTP applications (eg websites) using a set of rules to protect against various common attacks, such as SQL Injection and Cross site scripting (XSS).
Mod Security Web Application Firewall
Mod_Security is an apache (and IIS) module which provides an interface to apply rules to protect your HTTP applications. There are various providers of ModSecurity rules, both free and paid. Mod Security Web Application Firewall is open source.
Mod Security in plesk
Installing Mod Security Web Application Firewall in Plesk is very easy:
Tools & Settings > Updates and Upgrades > Add/Remove Components > Web hosting group
Check the box for ‘ModSecurity‘
Once installed, go to
Tools & Settings > Web Application Firewall (ModSecurity)
You can choose between On, Off and Detection Only
- On: The rules are enforced and connections will be terminated when matching rules are found.
- Detect Only: The rules are enforced and connections will be logged when matching rules are found. Not traffic will be dropped.
- Off: Rules are not enforced.
Mod Security in Apache
Install mod security (assuming centos and EPEL repo)
yum install mod_security mod_security_crs
edit the /etc/httpd/conf.d/mod_security.conf and change the SecRuleEngine option. You can choose between On, Off and Detection Only.
- On: The rules are enforced and connections will be terminated when matching rules are found.
- Detect Only: The rules are enforced and connections will be logged when matching rules are found. Not traffic will be dropped.
- Off: Rules are not enforced.
Restart apache
service httpd restart
Mod Security Rulesets
- Atomic Basic ModSecurity
- OWASP ModSecurity Core Rule Set (CRS)
- Advanced ModSecurity Rules by Atomicorp
- Comodo ModSecurity Rule Set (Linux)
Centos Mod Security file locations
- Mod Security Config File – /etc/httpd/conf.d/mod_security.conf
- Debug Log – /var/log/httpd/modsec_debug.log
- Audit log – /var/log/httpd/modsec_audit.log
- Rules – /etc/httpd/modsecurity.d/activated_rules
CloudFlare WAF
Cloud based WAF Cloudflare is a SAAS provider who offer a free tier, which includes a WAF as standard. Cloudflare is configured by setting the DNS for your site (you use cloudflare as name-servers and all traffic is then proxied through cloudflare servers, where it is checked and blocked if needed)
- Fast, Global Content Delivery Network.
- Fast, Powerful, And Secure DNS.
- Load Balancing.
- Argo Smart Routing.
- Web Optimisations.
- Local Storage Caching.
- AutoMinify.
- Rocket Loader.
Sources:
https://www.modsecurity.org/
https://docs.plesk.com/en-US/onyx/administrator-guide/server-administration/web-application-firewall-modsecurity.73383/
https://tecadmin.net/install-modsecurity-with-apache-on-centos-rhel/
4) WordPress Security – Malware scans
Malware detection on systems using maldet and clamav
Linux Malware Detect (LMD) is a malware scanner for Linux released under the GNU GPLv2 license, that is designed around the threats faced in shared hosted environments.
It uses threat data from network edge intrusion detection systems to extract malware that is actively being used in attacks and generates signatures for detection. In addition, threat data is also derived from user submissions with the LMD checkout feature and from malware community resources. The signatures that LMD uses are MD5 file hashes and HEX pattern matches, they are also easily exported to any number of detection tools such as ClamAV..
ClamAV® is an open source (GPL) anti-virus engine used in a variety of situations including email scanning, web scanning, and end point security. It provides a number of utilities including a flexible and scalable multi-threaded daemon, a command line scanner and an advanced tool for automatic database updates..
Together they make a great option for your linux servers – you can add some protection to mailboxes, web hosting and user home directories. linux malware detection using maldet and clamav on Plesk systems is possible, but you will need to install and configure using the command-line.
Installing LMD maldet
get the maldet source, extract and install
wget https://www.rfxn.com/downloads/maldetect-current.tar.gz
tar -xzf maldetect-current.tar.gz
./install.sh
Configure LMD
vim /usr/local/maldetect/conf.maldet
set the following:
email_alert : Set this to 1 to receive email alerts.
email_addr : Set this to your email address.
quar_hits : Set this to 1 to automatically quarantine malware.
quar_clean : Set this to 1 for automatic cleaning of detected malware.
scan_clamscan : Set this to 1 to enable scans using the clamAV engine.
Install Clamav
yum install clamav clamav-devel
once installed, update the definitions
freshclam
create a cron job to update definitions every hour, at 30 minutes past the hour
crontab -e
30    *    *   *   *   freshclam
Testing
Download the following (WARNING, these are malware files) from the European Institute for Computer Anti-Virus Research (eicar.org)
pick a nice location on your system
cd /path/to/scan
wget https://www.eicar.org/download/eicar.com.txt
wget https://www.eicar.org/download/eicar_com.zip
wget https://www.eicar.org/download/eicarcom2.zip
Run a manual scan on the folder we downloaded the test files
maldet -a /path/to/scan
At this point you should see that maldet detects and quarantines files. You can view detailed report information using the following command
maldet--report <ID of report>
5) WordPress Security – Automatic updates
OS updates
yum-cron is an alternate interface to yum that is optimised to be convenient to call from cron. It provides methods to keep repository metadata up to date, and to check for, download, and apply updates. Rather than accepting many different command line arguments, the different functions of yum cron can be accessed through config files.
Installing
yum install yum-cronThe next thing to do is to add the service to the available services:
systemctl enable yum-cron.serviceor
chkconfig yum-cron on
Configuring
open /etc/yum/yum-cron.conf in your editor of choice. In centos 7 there are 3 settings to change:
# Whether a message should emitted when updates are available.
update_messages = yes

# Whether updates should be downloaded when they are available. Note
# that updates_messages must also be yes for updates to be downloaded.
download_updates = yes

# Whether updates should be applied when they are available.  Note
# that both update_messages and download_updates must also be yes for
# the update to be applied
apply_updates = yes
CentOS 7 also has an hourly configuration file at /etc/yum/yum-cron-hourly.conf
There are 4 lines to change
#  What kind of update to use:
# default                            = yum upgrade
# security                           = yum --security upgrade
# security-severity:Critical         = yum --sec-severity=Critical upgrade
# minimal                            = yum --bugfix update-minimal
# minimal-security                   = yum --security update-minimal
# minimal-security-severity:Critical =  --sec-severity=Critical update-minimal
update_cmd = security

# Whether a message should emitted when updates are available.
update_messages = yes

# Whether updates should be downloaded when they are available. Note
# that updates_messages must also be yes for updates to be downloaded.
download_updates = yes

# Whether updates should be applied when they are available.  Note
# that both update_messages and download_updates must also be yes for
# the update to be applied
apply_updates = yes
You will now have hourly security updates and daily updates for everything else. The updates will download and apply automatically :D
The last thing you need to do is to turn on the yum cron service:
service yum-cron startor
systemctl start yum-cron.serviceAutomatic WordPress Security Updates
Since WordPress 3.7 Automatic updates have been available.
Automatic updates can be configured using one of two methods: defining constants in wp-config.php, or adding filters using a Plugin.
https://codex.wordpress.org/Configuring_Automatic_Background_Updates
Update using wp-cli
#!/bin/sh
#update core and database
wp-cli core update
wp-cli core update-db
#update plugins and themes
wp-cli plugin update --all
wp-cli theme update --all
You can set the above commands in a script to run as part of a cron task
6) WordPress Security – Hardening
Sucuri
Sucuri offers some basic hardening, I would recommend turning all of the hardening options on:
- Remove WordPress Version
- Block PHP Files in Uploads Directory
- Blocking PHP Files in WP-CONTENT Directory
- Block PHP Files in WP-INCLUDES Directory
- Information Leakage
- Default Admin Account
- Plugin and Theme Editor
Plesk
Plesk has the WordPress toolkit which can manage updates and can harden your WordPress installs
To check and secure WordPress installations:
- Go to WordPress.
- Do one of the following:
- Check the security of all WordPress installations, click Check Security.
- Secure a single WordPress installation, click the icon in the S column next to the name of the desired WordPress installation.
- To secure two or more WordPress installations, select the checkboxes for the corresponding WordPress installations, then click Check Security.
- Select the checkboxes corresponding to the security improvements you want to apply, then click Secure.
Caution: Keep in mind that not all security improvements can be rolled back. It is recommended to back up the corresponding subscription before securing WordPress installations.
The complete list of WordPress security improvements
The wp-content folder. The wp-content directory may contain insecure PHP files that can be used to damage your site. After WordPress installation, PHP files can be executed from the wp-content directory. The security check verifies that the execution of PHP files in the wp-content directory is forbidden. Note that custom directives in the .htaccess or web.config files might override this security measure. Also note that some of your plugins might stop working after securing the wp-content folder.
The wp-includes folder. The wp-includes directory may contain insecure PHP files that can be used to damage your site. After WordPress installation, PHP files can be executed from the wp-includes directory. The security check verifies that the execution of PHP files in the wp-includes directory is forbidden. Note that custom directives in the .htaccess or web.config files might override this security measure. Also note that some of your plugins might stop working after securing the wp-includes folder.
The configuration file. The wp-config.php file contains credentials for database access and other sensitive information. After WordPress installation, the wp-config.php file can be executed. If, for some reason, processing of PHP files by the web server is turned off, hackers can access the content of the wp-config.php file. The security check verifies that unauthorized access to the wp-config.php file is blocked. Note that custom directives in the .htaccess or web.config files might override this security measure.
Directory browsing permissions. If directory browsing is turned on, hackers can obtain information about your site (what plugins you use and so on). By default, directory browsing is turned off in Plesk. The security check verifies that directory browsing on the WordPress installation is turned off.
Database prefix. WordPress database tables have the same names in all WordPress installations. When the standard wp_ database table name prefix is used, the whole WordPress database structure is not a secret and anyone can obtain any data from it. The security check changes the database table name prefix to something other than wp_. The maintenance mode is turned on, all plugins are deactivated, the prefix is changed in the configuration file, the prefix is changed in the database, the plugins are re-activated, the permalink structure is refreshed, and then the maintenance mode is turned off.
Security keys. WordPress uses security keys (AUTH_KEY, SECURE_AUTH_KEY, LOGGED_IN_KEY, and NONCE_KEY) to encrypt information stored in the user’s cookies. A good security key should be long (60 characters or longer), random and complicated. This security check verifies that the security keys are set up and that they at least contain both alphabetic and numeric characters.
Permissions for files and directories. If permissions for files and directories do not comply with the security policy, these files can be used to hack your site. After WordPress installation, files and directories can have various permissions. The security check verifies that the permissions for the wp-config.php file are set to 600, for other files to 644, and for directories to 755.
Administrator’s username. When a WordPress copy is installed, by default there is a user with administrative privileges and the username admin. As a user’s username cannot be changed in WordPress, one only needs to guess the password to access the system as the administrator. The security check verifies that there is no user with the administrative privileges and the username admin.
Version information. There are known security vulnerabilities for each WordPress version. For this reason, displaying the version of your WordPress installation makes it an easier target for hackers. The version of an unprotected WordPress installation can be seen in the pages’ meta data and readme.html files. The security check verifies that all readme.html files are empty and that every theme has a functions.php file which contains the line: remove_action(\’wp_head\’, \’wp_generator\’);
Misc
File Permissions
For Directories:
find /path/to/your/wordpress/install/ -type d -exec chmod 755 {} \;
For Files:
find /path/to/your/wordpress/install/ -type f -exec chmod 644 {} \;
https://wordpress.org/support/article/hardening-wordpress/#file-permissions
Disable File Editing
The WordPress Dashboard by default allows administrators to edit PHP files, such as plugin and theme files. This is often the first tool an attacker will use if able to login, since it allows code execution. WordPress has a constant to disable editing from Dashboard. Placing this line in wp-config.php is equivalent to removing the ‘edit_themes’, ‘edit_plugins’ and ‘edit_files’ capabilities of all users:
define('DISALLOW_FILE_EDIT', true);
This will not prevent an attacker from uploading malicious files to your site, but might stop some attacks.
Rename the administrative account
When creating an administrative account, avoid easily guessed terms such as admin or webmaster as usernames because they are typically subject to attacks first. On an existing WordPress install you may rename the existing account in the MySQL command-line client with a command like
UPDATE wp_users SET user_login = 'newuser' WHERE user_login = 'admin';
Change the table_prefix
Many published WordPress-specific SQL-injection attacks make the assumption that the table_prefix is wp_, the default. Changing this can block at least some SQL injection attacks.
Some hardening plugins
Disable xmlrpc pingbacks:
https://en-gb.wordpress.org/plugins/disable-xml-rpc-pingback/
Limit login attempts:
https://en-gb.wordpress.org/plugins/wp-limit-login-attempts/
Totally disable xmlrpc:
https://en-gb.wordpress.org/plugins/disable-xml-rpc/
7) WordPress Security – SSL
Force SSL on the admin
define('FORCE_SSL_ADMIN', true);
https://codex.wordpress.org/Administration_Over_SSL
LetsEncrypt SSL certificates
Using letsencrypt in centos requires a few modifications to your centos before you can run the letsencrypt client. The setup for vhosts in centos is different from the setup in debian based distros. This is how I modified my centos install to be able to use letsencrypt-auto so that I can use the free letsencrypt SSL certificates
Modify vhost configurations
letsencrypt-auto can only work with one vhost setting per file, and it looks in /etc/httpd/sites-enabled for the vhost configurations. My centos setup had a directory called /etc/httpd/vhosts.conf.d which contained my vhost configurations.
Firstly we need to create /etc/httpd/sites-available and /etc/httpd/sites-enabled so that letsencrypt-auto can manage our vhosts.
mkdir /etc/httpd/sites-available
mkdir /etc/httpd/sites-enabled
Move your existing vhost configurations into /etc/httpd/sites-available so that your sites dont stop working
mv /path/to/vhosts/*.conf /etc/httpd/sites-availableNext, symlink your vhosts to the enabled-sites directory so that they are included when apache starts
find /etc/httpd/sites-available -name *.conf | \
while read filename \
do \
    ln -s "/etc/httpd/sites-available/$filename" "/etc/httpd/sites-emabled/$filename"
done
next, edit your httpd.conf, add in a line (or modify an existing line including the location of your vhost files) to enable the sites on startup – this is the debian way
Include sites-enabled/*.confRestart httpd to make sure it all still works (I dont think systemctl reload httpd.service works for this step -I didnt try it though)
systemctl restart httpd.serviceWe now have Centos configured in a way that will allow us to use letsencrypt-auto out-of-the-box!
Sources: digitalocean
Install letsencrypt
If you dont already have git installed, you’ll need it
yum install gitTo install the letsencrypt client, clone it from git:
git clone https://github.com/letsencrypt/letsencrypt /opt/letsencryptFetch your first ssl certificate
You should now be ready to fetch certificates using the letsencrypt-auto client
/opt/letsencrypt/letsencrypt-auto --apache -d example.comYou can also install the certificate for subdomains at the same time
/opt/letsencrypt/letsencrypt-auto --apache -d example.com -d www.example.com -d static.example.comThe first time you run letsencrypt in centos the client will download and install dependenices, then it will present you with an ncurses UI with some options for you to pick from, including setting up a 301 redirect from a non-https to an https version of your site
If the client fails, it will give you reasons on the stdout – I had to separate my vhost files so that there was one configuration per file (I deleted the :443 section, left the :80 section and let the client generate the ssl version for me)
If the certificates install correctly, you’ll get something that looks like this:
Congratulations! Your certificate and chain have been saved at    /etc/letsencrypt/live/example.com/fullchain.pem.
Your cert will expire on 2016-04-21.
To obtain a new version of the certificate in the future, simply run Let's Encrypt again.
You arent done yet though – letsencrypt will have created a vhost file in the sites-enabled folder – its probably best to move this to the sites-available folder and symlink it back to the sites-enabled folder.
Certificate renewal
Letsencrypt certificates expire after 90 days, so you hvae to setup renewal
The easiest way is with a cronjob.
Test the renewal with:
/opt/letsencrypt/letsencrypt-auto renewYou’ll get a message saying that your certificates arent due for renewal yet, thats ok, we just needed to see that the renewal found your existing certs.
Add the command to a cronjob (its recommended on the lets-encrypt site to try twice a day)
crontab -e0 6,12 * * * /opt/letsencrypt/letsecrypt-auto renewYou now have letsencrypt in centos! next you’ll want to check the cypher-strenght of your new setup – I wrote a post about hardening ssl ciphers to help :D
The following instructions are for wildcard certs (supported as of mid-2018)
Wildcard certs are now supported, but if you are using cloudflare, there are some issues – DNS is the preferred way to authenticate your domain name with letsencrypt, but this has to be automated. If you use cloudflare, then you can get an API key, and letsencrypt will temporarily change your dns settings while authenticating with the CA when the renewal is happening.
Its a bit of a round-about process, but goes something like this:
1) do all the things from above first (if you already have working cert, or working wildcard cert, then skip this)
2) log in to cloudflare and grab an API key
Save it in a text file somewhere (I know, not ideal, but so far there isn’t any other way)
dns_cloudflare_email = bob@example.com
dns_cloudflare_api_key = 1234567890
3) run this to get your first * cert
/opt/eff.org/certbot/venv/bin/pip -q install certbot-dns-cloudflare
/opt/letsencrypt/certbot-auto --dns-cloudflare --dns-cloudflare-credentials /path/to/letsencrypt-text-file -d *.example.com --preferred-challenges dns-01 certonly --server https://acme-v02.api.letsencrypt.org/directory
This will work great, until you try to renew. You’ll then get the following errors: unexpected error: ‘Namespace’ object has no attribute ‘dns_cloudflare_credentials’. Skipping. This is because certbot updates itself each time it runs and nukes out the cloudflare dns plugin :| the workaround I’m using is to make a little script with the following:
#!/bin/sh
/opt/letsencrypt/certbot-auto --version
/opt/eff.org/certbot/venv/bin/pip -q install certbot-dns-cloudflare
/opt/letsencrypt/certbot-auto renew >> /var/log/le-renew.log
and run that from your crontabs – the script does the following:
1) run certbot with a –version flag – if certbot sees that it its out of date, it will self-update
2) reinstall the cloudflare-dns plugin (if certbot self-updated, then it looses all previous plugin info)
3) renew the certs that we have.
8) WordPress Security – Fail2Ban
Installing and configuring the fail2ban centos service
fail2ban is a service for linux systems that checks log files for failed login attempts and automatically inserts firewall rules to block further attempts at logins from those IP addresses for a specified amount of time. Installing fail2ban on centos is relatively easy
Firstly, make sure that you habve the epel repo iavailable, then install and enable fail2ban by issuing the following commands
yum install epel-release
yum install fail2ban
systemctl enable fail2ban
You now have fail2ban installed and enabled, but not yet configured. The config file for fail2ban is /etc/fail2ban/jail.conf, however, if modifications are made here, then they may be overwritten in future by system updates, so its recommended to create your own config file:
Protecting SSH with fail2ban
vim /etc/fail2ban/jail.local
paste the following into the file to enable a 1 hour ban on failed logins from ssh
[DEFAULT]
bantime = 3600
banaction = iptables-multiport

[sshd]
enabled = true
lastly, restart the fail2ban service
systemctl restart fail2ban
Protecting apache with fail2ban
edit the local config:
vim /etc/fail2ban/jail.local
[apache]
enabled  = true
port     = http,https
filter   = apache-auth
logpath  = /var/log/httpd/error.log
maxretry = 6
Protecting wordpress with fail2ban
install wp-fail2ban plugin & copy the provided filter
cp /var/www/html/wp-content/plugins/wp-fail2ban/filters.d/wordpress-hard.conf /etc/fail2ban/filter.d/
edit the local config:
vim /etc/fail2ban/jail.local
[wordpress-hard]
enabled = true
filter = wordpress-hard
logpath = /var/log/auth.log
maxretry = 3
port = http,https
lastly, restart the fail2ban service
service fail2ban restart
Fail2ban modsecurity rules
create /etc/fail2ban/filter.d/modsec.conf
#Fail2Ban configuration file
#Author: Florian Roth
[Definition]
failregex = [.?]\s[\w-]\s\s
ignoreregex =
edit the local config:
vim /etc/fail2ban/jail.local
[modsec]
enabled  = true
filter   = modsec
action   = iptables-multiport[name=ModSec, port="http,https"]
logpath  = /var/log/httpd/modsec_audit.log
bantime  = 600
maxretry = 3
Leave a Reply
You must be logged in to post a comment.