Building the Pibow Ninja Coupe is a satisfying process – the layered acrylic pieces slot together around the Raspberry Pi in a specific order, held together with the included nylon standoffs and screws. It’s the kind of assembly that takes about fifteen minutes but feels like you’re doing something properly rather than just dropping a board into a box. The end result is a case that looks considered and professional while remaining completely DIY in character.
The Build Process
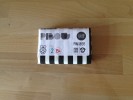
Each acrylic layer is laser-cut to precise tolerances and ships with a protective film that you peel off before assembly – satisfying in the way that peeling protective film always is. The layers stack in a numbered order, with the Pi sandwiched between the base and the GPIO access layer. Nylon standoffs hold everything together, tightened finger-tight rather than with a tool to avoid cracking the acrylic. The ports align correctly through cutouts in the layers on all four sides. The whole assembly is genuinely well-engineered.
Verdict
The finished Pibow Ninja Coupe looks excellent and holds the Pi securely while keeping all ports and the GPIO header accessible. The build process is enjoyable rather than frustrating, which is not always the case with Pi cases. Pimoroni have clearly thought about both the assembly experience and the finished product, and it shows. A well-made case that makes the Pi feel like a proper finished device rather than a bare board.
Leave a Reply
You must be logged in to post a comment.